(1) NginX 설정파일
확장자: .conf
경로: 설치방법에 따라 다름
- /etc/nginx/conf.d/*.conf <-- 가장 일반적
- /etc/nginx/site-available/*.conf
- /etc/nginx/site-enabled/*.conf
설정파일 구조: 블록, 지시어
http {
# 최상위 블록
# 모든 지시어는 하위 블록에 상속됨.
server { # 하나의 웹사이트 단위
# 하위 블록의 지시어는 상위 블록 것보다 먼저 적용됨.
location <PATH> {
# 특정 URL을 처리
}
}
}
events {
# 네트워크의 동작방법과 관련된 설정값
# 위의 블록들과 상속관계를 갖지 않음
# 이벤트 블록 전용 지시어 사용
}
- 지시어
server_name 서비스할 호스트명 정의;
include 포함할 설정파일 경로; <-- 관련 설정 파일을 재사용하는 용도
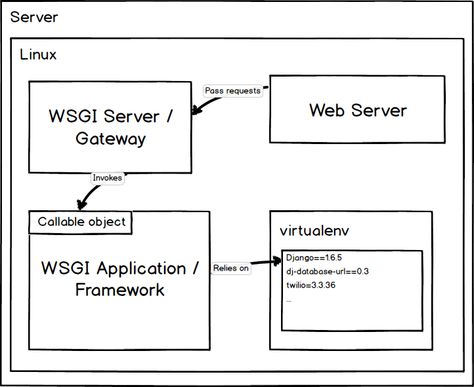
(2) 서버 구조
외부 요청 ↔︎ 웹 서버 ↔︎ WSGI ↔︎ 애플리케이션
웹 서버 (여기서는 NginX 사용)
Apache
NginX
WSGI (Web Server Gateway Interface) wiki
gunicorn: 파이썬으로 작성된 서버로, HTTP 통신만 제공
uwsgi: C언어로 작성된 wsgi용 서버
gunicorn vs uwsgi
uwsgi는 제공되는 방식이 많은 만큼 구축이 상대적으로 어렵다.
gunicorn은 instagram에서 사용중임 (그만큼 밀리지 않는단 얘기)
애플리케이션 비교는 생략 (너무 많음, 여기서는 Django 사용)
(2) 프록시 방법
위 서버구조에서 프록시는 웹 서버와 WSGI 사이에서 일어나며, WSGI는 애플리케이션과 하나라고 봐도 무방하다.
사실상 파이썬 애플리케이션이 혼자 통신하기 힘드니 도와주는 친구라고 생각하자.
HTTP 통신
[nginx 설정파일 .conf]
server {
listen 80;
server_name <SERVER_HOSTNAME>;
access_log /var/log/nginx/example.log;
location / {
proxy_pass http://<IP or Domain>:<PORT>;
proxy_set_header Host $host;
proxy_set_header X-Forwarded-For $proxy_add_x_forwarded_for;
}
}
또는
upstream example_server {
server <IP or Domain>:<Port>;
}
server {
...
location / {
proxy_pass http://example_server;
proxy_set_header Host $host;
proxy_set_header X-Forwarded-For $proxy_add_x_forwarded_for;
}
}
proxy_set_header 와 같은 옵션은 서버가 여러 개면 추가하는게 좋음 (단, 필수는 아님)
- gunicorn 은 이 방식만 가능
[gunicorn 명령어, 별도 파일 X]
gunicorn --chdir <PROJECT_DIR> --bind :<PORT> <WSGI_PATH>.wsgi:application
- uwsgi 는 별도의 파일이 필요
[uwsgi 설정파일 .ini]
[uwsgi]
chdir=<wsgi 모듈이 있는 프로젝트 디렉토리 경로>
module=<wsgi 모듈 경로>.wsgi:application
env = DJANGO_SETTINGS_MODULE=<settings 모듈 경로>
http=:<PORT>
logto=/var/log/<path>/@(exec://date+%%Y-%%m-%%d).log
# 기타 설정들은 알아서
# 맨 위 "[uwsgi]"의 의미는 wigs 모듈 별로 관리할 수 있는 "서버 식별자 = 이름" 정도로 볼 수 있음.
# 하나의 설정 파일에 다수의 서버가 관리가능하나, 설정 파일은 나누는 것을 추천
[uwsgi 명령어]
uwsgi <.ini 경로>
- 명령어를 일일이 치기 귀찮을 경우, 데몬으로 서비스 등록하는 방법이 있음 (아래 참고)
[서비스 등록 스크립트, uwsgi.service]
[Unit]
Description=uWSGI service
After=syslog.target
[Service]
ExecStart=<uwsgi binary 경로> -i <ini 파일 경로>
Restart=always
KillSignal=SIGQUIT
Type=notify
StandardError=syslog
NotifyAccess=all
[Install]
WantedBy=multi-user.target
- 경로: /etc/systemd/system/uwsgi.service
- 명령어:
systemctl start uwsgi
(스크립트 변경 시 데몬을 재시작해야함)
Socket 파일로 통신 (gunicorn 은 불가능)
[nginx 설정파일 .conf]
server {
listen 80;
server_name <SERVER_HOSTNAME>;
access_log /var/log/nginx/example.log;
location / {
uwsgi_pass unix:<.sock 파일 경로>;
include uwsgi_param;
}
}
또는
upstream example_server {
server unix:<.sock 경로>
}
server {
...
location / {
uwsgi_pass example_server;
include uwsgi_param;
}
}
[uwsgi 설정파일 .ini]
[uwsgi]
chdir=<wsgi 모듈이 있는 프로젝트 디렉토리 경로>
module=<wsgi 모듈 경로>.wsgi:application
env = DJANGO_SETTINGS_MODULE=<settings 모듈 경로>
socket=<.sock 경로>
chmod-socket=666
logto=/var/log/<path>/@(exec://date+%%Y-%%m-%%d).log
# 가급적 소켓파일의 권한을 명시해주면 좋다. (아래의 경우 deploy 유저)
uid=deploy
gid=deploy
chown-socket=deploy:deploy
[uwsgi 명령어 / 서비스 등록 스크립트] : 위와 동일
포트로 통신 (gunicorn 은 불가능)
[nginx 설정파일 .conf]
server {
listen 80;
server_name <SERVER_HOSTNAME>;
access_log /var/log/nginx/example.log;
location / {
uwsgi_pass <IP or Domain>:<PORT>;
include uwsgi_param;
}
}
또는
upstream example_server {
server <IP or Domain>:<Port>;
}
server {
...
location / {
uwsgi_pass example_server;
include uwsgi_param;
}
}
[uwsgi 설정파일 .ini]
[uwsgi]
chdir=<wsgi 모듈이 있는 프로젝트 디렉토리 경로>
module=<wsgi 모듈 경로>.wsgi:application
env = DJANGO_SETTINGS_MODULE=<settings 모듈 경로>
socket=:<PORT>
chmod-socket=666
logto=/var/log/<path>/@(exec://date+%%Y-%%m-%%d).log
[uwsgi 명령어 / 서비스 등록 스크립트] : 위와 동일
Ref.
gunicorn 환경설정
uwsgi 설정파일
nginx 설정파일:
'Note' 카테고리의 다른 글
| 의존성 관리와 빌드 자동화 툴 (Dependency management and a build automation tool) (2) | 2019.03.30 |
|---|---|
| Android Plugin 만들기 / Unity 에서 사용하기 (0) | 2019.03.30 |
| [GooglePlay] 인앱 결제 (0) | 2018.12.29 |
| GDB 사용법 (0) | 2018.06.29 |
| make 사용법 (+Makefile) (0) | 2018.06.29 |